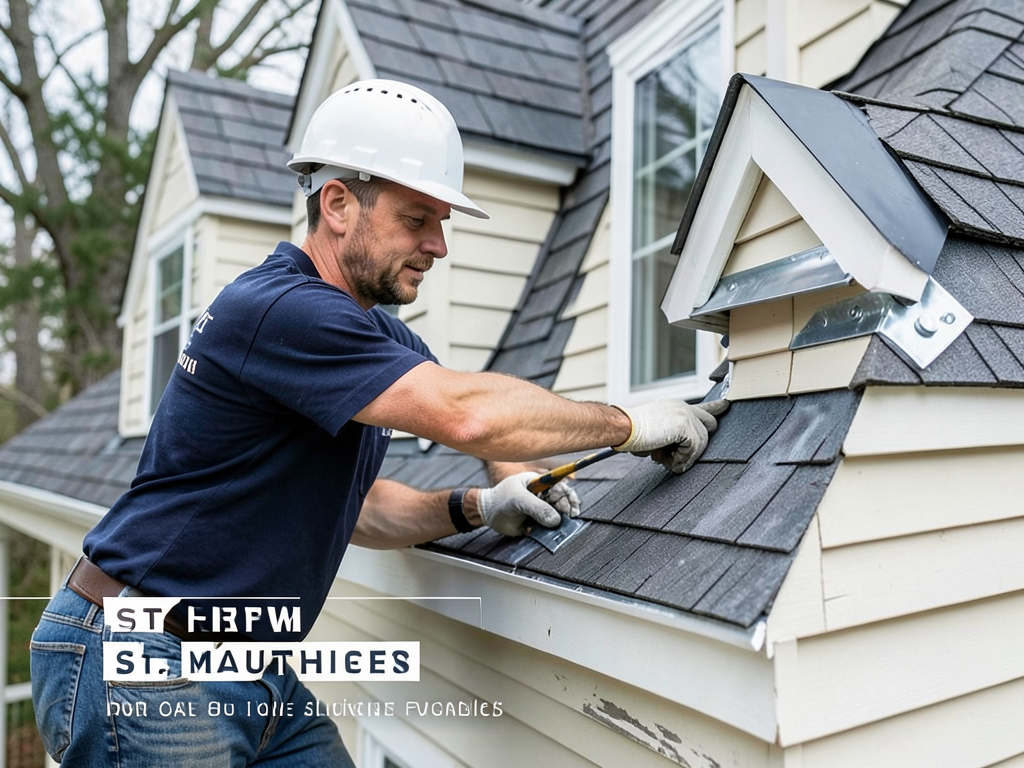
Why the flashing around your dormer windows is the most likely spot for a leak in St. Matthews
Dormer windows create beautiful architectural detail on Cape Cod and gabled homes throughout St. Matthews, but those same charming features are often the source of frustrating roof leaks. The flashing that seals the intersection between your dormer walls and roof surface faces constant stress from Louisville’s seasonal weather patterns, making it the most vulnerable spot for water intrusion in many local homes.. Read more about Dealing with roof leak disputes between landlords and tenants in the Louisville rental market.
Water typically finds its way through failed step flashing, deteriorated caulking around window casings, or compromised apron flashing beneath the dormer. These leaks often start small but can cause extensive damage to interior walls, ceilings, and insulation before homeowners notice visible signs. Understanding how dormer flashing works and what causes it to fail is the first step in protecting your St. Matthews home from costly water damage. Why we are the highest rated roofing team in the Louisville metro area.
How dormer window flashing works in Louisville’s climate
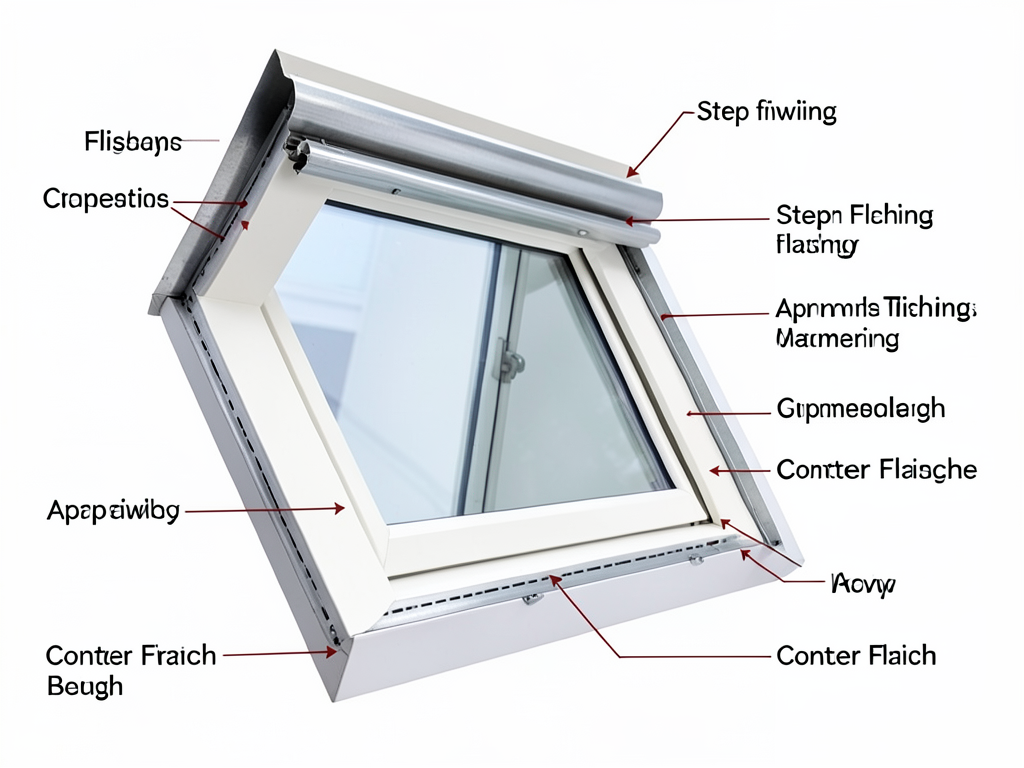
Dormer flashing creates a weatherproof barrier where the vertical dormer walls meet the sloped roof surface. This system includes multiple components that must work together to shed water effectively. Step flashing runs up the side walls in overlapping layers, while apron flashing extends from beneath the siding across the roof deck. Counter flashing, when present, folds into mortar joints or is sealed against the dormer siding.. Read more about Dealing with the Steep Slope Challenges of Roofs in Iroquois Park and Fairdale.
In St. Matthews, these flashing systems face unique challenges from our local climate. The Ohio Valley’s high humidity causes moisture to accumulate behind siding, while frequent temperature swings between seasons make materials expand and contract. Wind-driven rain during spring storms can force water under poorly sealed flashing, and ice dam formation in winter creates additional pressure points that stress these vulnerable joints.
Local building practices in St. Matthews often involve retrofitting older homes with modern windows, which can create compatibility issues between new window frames and original flashing details. Many homes built between 1950 and 1980 used aluminum flashing that corrodes over time, while newer synthetic materials may not bond properly with older sealants.
Common causes of dormer window leaks in St. Matthews homes
The most frequent failure point is deteriorated step flashing along the dormer side walls. Over time, the metal strips that overlap between shingles can rust, separate, or pull away from the wall surface. This creates gaps where water can penetrate during heavy rain or when ice builds up along the roof edge. EPA mold information.
Window seal failure represents another major culprit. The caulking or sealant around window frames dries out, cracks, or separates from the siding material. Unlike roof leaks that appear as ceiling stains, window seal failures often show up as water damage around the interior window trim or along adjacent walls.
Siding and apron flashing issues frequently occur in homes where the original roof was replaced without properly addressing the dormer-to-roof transition. Missing or improperly installed J-channels allow water to run behind the siding instead of being directed away from the structure. Apron flashing that’s too short or lacks proper overlap with the roof shingles fails to direct water away from the dormer base.
Valley leaks near dormer transitions create some of the most challenging repair scenarios. When a dormer interrupts a roof valley, water flow patterns change dramatically. Debris accumulation in these areas prevents proper drainage, and the complex geometry makes proper flashing installation difficult. Many St. Matthews homes have multiple dormers clustered together, creating intersecting valleys that compound these problems. Commercial flat roof repair and maintenance for business owners in NuLu.
DIY inspection guide for dormer window leaks
Start your inspection from inside the attic during daylight hours. Look for pinpoints of light around the dormer area, which indicate gaps in the roof structure. Check for water stains, mold growth, or damp insulation near the dormer walls. Use a moisture meter to test suspicious areas – readings above 15% indicate active moisture problems.
From the exterior, examine the dormer flashing during dry weather. Look for signs of rust, separation, or missing pieces along the side walls. Check the condition of caulking around window frames – it should be flexible and continuous without gaps or cracks. Inspect the apron flashing for proper overlap with both the siding and roof shingles.
During the next rainfall, observe water behavior around your dormers from a safe distance. Look for water cascading over flashing instead of flowing into gutters, or for streams running down dormer walls. These visual indicators often reveal problems that aren’t apparent during dry conditions.
Pay attention to seasonal patterns in your leak symptoms. If water appears primarily during windy storms from the southwest, wind-driven rain is likely forcing water under compromised flashing. Winter leaks that worsen during sunny afternoons often indicate ice dam formation behind the dormer.
Louisville climate impacts on dormer flashing longevity
St. Matthews experiences approximately 45 inches of annual rainfall, with peak precipitation occurring during spring thunderstorms and winter systems. This moisture load stresses dormer flashing systems that must handle concentrated water flow from both the roof surface and window drainage. The freeze-thaw cycles common in our region cause flashing materials to expand and contract, eventually breaking the seals that keep water out.
Ohio Valley humidity levels often exceed 70% during summer months, creating conditions where moisture accumulates behind siding materials. This trapped moisture can cause wood rot in the dormer structure and accelerate corrosion of metal flashing components. The thermal mass of brick and stone dormers common in older St. Matthews neighborhoods retains heat, creating temperature differentials that stress flashing joints.
Wind patterns in the Louisville area frequently come from the southwest during storm events, creating uplift pressure on roof edges and dormer walls. These wind loads can lift poorly secured flashing or drive rain under flashing overlaps. The Jefferson County wind speed requirements for shingle fastening (up to 90-115 mph zones) also apply to flashing installation, though many older installations don’t meet current standards.
Ice dam formation presents a significant threat to dormer flashing integrity. When snow melts on warmer roof areas and refreezes at the cooler eaves, water backs up under shingles and flashing. The ice expansion pressure can force flashing away from walls, creating entry points for meltwater during subsequent thaw cycles.
Repair versus replacement considerations for dormer leaks
Minor flashing repairs often provide temporary solutions for dormer leaks, but understanding when replacement makes more sense requires evaluating several factors. The age of your existing roofing system plays a crucial role – if your roof is over 15 years old and experiencing multiple leak points, a comprehensive dormer flashing replacement during a full roof replacement often proves more cost-effective. The most trusted roofing services in Germantown and Schnitzelburg.
Material compatibility issues frequently drive replacement decisions. Older aluminum flashing may not bond properly with modern sealants, and mixing materials can create galvanic corrosion problems. When original flashing details are unknown or undocumented, complete replacement ensures all vulnerable points receive proper treatment rather than patching individual failures.
The extent of water damage behind visible surfaces often determines whether repair or replacement is necessary. If moisture meter readings show extensive saturation in surrounding materials, or if mold remediation is required, the scope of work typically expands beyond simple flashing repair to include structural repairs and moisture barrier replacement.
Building code compliance represents another critical factor. Kentucky Residential Code requirements for ice and water shield installation in specific areas may not have been met in older installations. Current standards require ice and water shield in valleys and along eaves, extending up roof slopes adjacent to vertical walls – requirements that often necessitate complete flashing system replacement rather than spot repairs. Reliable residential roofing specialists serving Jeffersonville and Clarksville.
Emergency temporary measures for active dormer leaks
When a dormer leak becomes active during a storm, immediate action can prevent extensive interior damage. From inside the attic, position a tarp or plastic sheeting beneath the leak point, creating a funnel that directs water to a bucket rather than allowing it to spread across insulation and ceiling materials.
Exterior temporary measures require extreme caution and should only be attempted if safe roof access is available. A properly secured tarp can shed water away from the vulnerable flashing area, but must extend well beyond the leak point and be anchored to prevent wind uplift. Never attempt these measures during active lightning or when roof surfaces are icy.
Interior water collection strategies involve more than just placing buckets under drips. Use absorbent materials like towels or rags to contain spreading water, and check ceiling areas below the leak for developing bulges that indicate trapped water. Carefully puncture these bulges to release water, preventing ceiling collapse and limiting damage spread.
Document all active leak conditions with photos and notes about timing, weather conditions, and visible water entry points. This information proves invaluable for insurance claims and helps roofing professionals diagnose the exact failure point when permanent repairs begin.
Insurance claim process for dormer window leaks in St. Matthews
Most homeowner insurance policies cover sudden dormer leaks caused by storm damage, but gradual deterioration from age or poor maintenance typically falls under excluded wear and tear. Understanding this distinction helps set realistic expectations for claim outcomes in St. Matthews, where many homes have aging dormer systems.
The claims process begins with immediate documentation of damage. Take clear photos of active leaks, water stains, and any visible exterior damage to flashing or surrounding materials. Keep receipts for any emergency measures like tarping or water damage mitigation, as these costs often qualify for reimbursement even if the primary claim is denied.
Insurance adjusters typically require access to both interior damage and exterior roof areas. Be prepared to discuss the age of your roofing system, any previous repairs, and the history of leak problems. Some adjusters may recommend their preferred contractors, but you retain the right to choose your own roofing professional for repairs.
Policy deductibles for storm damage claims in Jefferson County typically range from $500 to $2,500, depending on your specific coverage. For extensive dormer repairs involving structural elements or interior restoration, the deductible may represent a small portion of total repair costs, making professional assessment worthwhile even for older systems.
Preventing future dormer leaks through proper maintenance
Annual dormer inspections during dry weather can identify potential problems before they cause interior damage. Check all flashing joints for signs of separation, rust, or deterioration. Test caulking flexibility by pressing gently – if it cracks or crumbles, replacement is needed. Clean debris from valley areas near dormers to ensure proper water drainage during storms.
Gutter maintenance directly impacts dormer leak prevention. Clogged gutters cause water to back up under roof edges and dormer flashing. Ensure downspouts direct water at least five feet from foundation walls, preventing basement moisture issues that can affect overall home moisture levels and indirectly stress roof systems.
Tree trimming around dormers prevents physical damage from branches and reduces debris accumulation that can trap moisture against flashing. Limbs that rub against dormer walls during wind create wear points that eventually compromise flashing seals. Maintain at least three feet of clearance between tree branches and roof surfaces.
Consider professional roof coating applications every 5-7 years for homes with older flashing systems. These elastomeric coatings can extend the life of existing flashing by creating an additional moisture barrier, though they don’t address underlying structural issues. This preventive measure often proves cost-effective compared to emergency leak repairs.
Choosing the right contractor for dormer leak repairs
Dormer leak repairs require specialized expertise that goes beyond basic roofing skills. The complex geometry of dormer-to-roof transitions demands experience with proper flashing integration, window sealing techniques, and understanding of how different materials interact under stress. Ask potential contractors about their specific experience with dormer repairs in St. Matthews and surrounding Louisville neighborhoods.. Read more about Repairing the Complex Roof Lines of Victorian Homes in the Phoenix Hill Neighborhood.
Verify contractor licensing and insurance coverage specific to roofing work in Jefferson County. Request references for similar dormer repair projects, and follow up on those references to confirm the quality and durability of completed work. Be wary of contractors who offer quick fixes without addressing underlying causes or who cannot explain their repair methodology in detail.
Quality dormer repairs should include a thorough assessment of surrounding materials, not just the visible leak point. This means checking for water damage in adjacent walls, evaluating the condition of window frames and siding, and ensuring proper integration with existing roofing materials. Contractors who skip these diagnostic steps often provide temporary solutions that fail again within months.
Understand the warranty terms for both materials and workmanship. Quality flashing materials typically carry 20-30 year warranties, but the workmanship warranty often proves more important for long-term performance. Look for contractors who offer at least a 5-year workmanship warranty on dormer repairs, as this demonstrates confidence in their installation techniques.
St. Matthews architectural considerations for dormer repairs
St. Matthews features diverse architectural styles from different eras, each presenting unique dormer repair challenges. Cape Cod homes built in the 1940s and 1950s often have original cedar shake roofs with copper flashing that requires specialized restoration techniques. Mid-century ranch homes may have aluminum-framed windows with integrated flashing that demands careful removal and replacement.
Historic district considerations affect repair approaches for homes near Seneca Park and within established St. Matthews neighborhoods. Some areas have guidelines requiring material matching or approval for visible exterior changes. Understanding these requirements before beginning repairs prevents costly rework and ensures compliance with local preservation standards.
Modern additions and renovations create dormer configurations that may not match original architectural proportions. These newer installations sometimes use materials or flashing techniques incompatible with existing roof systems. Evaluating the integration between old and new construction elements often reveals hidden vulnerabilities that contribute to leak problems.
Elevation and exposure factors specific to St. Matthews geography influence dormer performance. Homes on higher ground near the Watterson Expressway may experience different wind loads than those in low-lying areas near Chenoweth Run Creek. These microclimatic differences affect flashing durability and may require enhanced installation techniques in certain locations.
Cost factors for dormer leak repairs in the Louisville area
Dormer leak repair costs vary significantly based on the extent of damage and repair approach. Simple flashing repairs for isolated leaks typically range from $500 to $1,500, while comprehensive dormer flashing replacement can cost $2,000 to $5,000 or more. Factors affecting cost include dormer size, roof pitch, material accessibility, and whether interior water damage requires repair.
Material selection impacts both initial cost and long-term performance. Copper flashing offers superior longevity but costs 3-4 times more than galvanized steel. Synthetic rubber flashing products provide excellent weather resistance at moderate prices, while aluminum remains the most economical option despite shorter service life in our climate.
Permit requirements in Jefferson County add administrative costs but ensure repairs meet current building standards. Simple flashing repairs may not require permits, but work involving structural modifications or roof deck replacement typically does. Factor permit fees of $50 to $200 into project budgets, along with potential inspection costs.
Emergency repair premiums apply when addressing active leaks during peak storm seasons. Contractors often charge 25-50% more for storm damage repairs due to increased demand and hazardous working conditions. Planning repairs during off-peak seasons can reduce costs while ensuring thorough, unhurried workmanship.
Long-term solutions for chronic dormer leak problems
Homes experiencing repeated dormer leaks often require comprehensive solutions rather than spot repairs. This may involve complete dormer reconstruction with modern flashing integration, window replacement with improved weather sealing, or even dormer redesign to eliminate problematic architectural features. While these solutions require significant investment, they often prove more economical than repeated emergency repairs.
Advanced moisture management systems can address chronic dormer leak issues. This includes installing proper house wrap integration, adding ventilation to prevent moisture accumulation, and using ice and water shield products that extend beyond traditional flashing zones. These systems create redundant protection layers that compensate for minor flashing failures.
Climate-adaptive design modifications may be necessary for homes in particularly vulnerable locations. This could involve adding cricket structures behind large dormers to improve water drainage, installing snow guards to prevent ice dam formation, or upgrading to impact-resistant materials in areas prone to wind-driven rain penetration.
Regular monitoring programs help identify developing problems before they cause interior damage. This includes seasonal inspections, moisture meter testing of suspicious areas, and documentation of any changes in leak patterns or severity. Early intervention typically reduces repair costs by 50-75% compared to addressing established water damage.
Frequently Asked Questions
How can I tell if my dormer leak is from the roof or the window?
Roof leaks typically appear as ceiling stains directly below the dormer, while window seal failures show water damage around the interior window frame or adjacent walls. To test, spray water on the exterior during dry weather – if water enters around the window trim but not the ceiling below, it’s likely a window seal issue.
How long should dormer flashing last in Louisville’s climate?
Quality dormer flashing typically lasts 20-30 years in our climate, but factors like material quality, installation technique, and exposure to severe weather can reduce this to 10-15 years. Homes in wind-prone areas or those with poor attic ventilation often experience shorter flashing lifespans due to accelerated deterioration.
Can I repair dormer flashing myself or should I hire a professional?
Minor caulking repairs around windows can be DIY projects, but flashing repairs require roofing expertise to ensure proper integration with existing materials and weatherproofing. Improper flashing installation often causes more damage than the original leak, making professional assessment worthwhile for most dormer leak situations.
Will my homeowner’s insurance cover dormer leak repairs?
Insurance typically covers sudden damage from covered perils like storms or falling trees, but not gradual deterioration from age or poor maintenance. If the leak resulted from recent severe weather, documentation of damage and prompt professional assessment improve claim approval chances.
How much does it cost to repair a dormer leak in St. Matthews?
Repair costs range from $500 for simple flashing repairs to $5,000+ for comprehensive dormer reconstruction with interior water damage repair. Factors affecting cost include the extent of damage, materials used, roof accessibility, and whether structural repairs are needed beyond the visible leak point.
What’s the best time of year to repair dormer leaks?
Late spring through early fall offers ideal conditions for dormer repairs, with stable weather and longer daylight hours. However, active leaks should be addressed immediately regardless of season to prevent interior damage. Many contractors offer emergency services year-round for urgent situations.
How can I prevent dormer leaks during Louisville’s storm season?
Annual inspections before storm season, keeping gutters clean, trimming trees near dormers, and ensuring proper attic ventilation all help prevent leaks. Consider professional assessment if your home has a history of dormer problems or if you notice any signs of flashing deterioration during routine inspections.
Are there specific building codes for dormer flashing in Jefferson County?
Jefferson County follows Kentucky Residential Code requirements, which mandate proper flashing integration, ice and water shield in valleys and along eaves, and specific overlap dimensions for step flashing. Local codes may have additional requirements for historic districts or homes in high-wind zones.
How do I know if my dormer leak has caused structural damage?
Signs of structural damage include sagging ceiling areas below the dormer, soft or spongy roof deck when walked on, visible mold growth in attic spaces, or water stains that expand over time. Professional moisture testing can identify hidden damage before it becomes visible.
Should I replace my entire roof if I have dormer leaks?
If your roof is over 15 years old and experiencing multiple leak points including dormers, a complete replacement often proves more cost-effective than repeated spot repairs. This allows proper integration of all flashing systems and ensures uniform material warranties across your entire roof surface.
- Interior inspection
Check attic for water stains, mold, or daylight penetration around dormer area. Use moisture meter to test suspicious spots.
- Exterior examination
Inspect flashing for rust, separation, or missing pieces. Check caulking around windows for cracks or gaps.
- Water testing
During dry weather, have someone spray water on dormer while you observe from inside attic for entry points.
- Weather pattern analysis
Note when leaks occur – during wind-driven rain, ice dam formation, or only during heavy downpours.
- Professional assessment
Document findings and consult roofing professional for accurate diagnosis and repair recommendations.
Take action before your dormer leak causes serious damage
Water intrusion through dormer flashing doesn’t just create unsightly ceiling stains – it can lead to structural rot, mold growth, and costly interior repairs that far exceed the price of professional flashing repair. The humid Louisville climate accelerates moisture damage, making prompt attention to dormer leaks essential for protecting your St. Matthews home investment. Protecting your Lake Louisvilla home from high winds and waterfront humidity.
If you’re noticing water stains around your dormer windows, experiencing leaks during storms, or simply want to prevent problems before they start, professional assessment can identify vulnerabilities and recommend appropriate solutions. Our team understands the unique challenges that Louisville’s weather patterns create for dormer flashing systems, and we offer comprehensive repair services backed by quality warranties.
Don’t wait for the next storm to turn a small flashing gap into a major water damage disaster. Call (502) 678-7557 today to schedule your dormer inspection and protect your home from costly water damage. Our experienced technicians will diagnose the exact source of any leaks and provide clear recommendations for lasting repairs that stand up to Kentucky’s challenging climate.
Pick up the phone and call (502) 678-7557 before the next storm hits. Your home deserves the protection that comes from properly installed, high-quality dormer flashing that keeps water where it belongs – outside your walls.
Fortress Roofing – Protecting St. Matthews homes with expert dormer leak repairs and comprehensive roofing solutions. For more information, visit FEMA storm damage resources.
{
“@context”: “https://schema.org”,
“@type”: “BlogPosting”,
“headline”: “Why the flashing around your dormer windows is the most likely spot for a leak in St. Matthews”,
“description”: “Learn why dormer window flashing fails in St. Matthews homes and how to spot leaks before water damage spreads through your Cape Cod or gabled roof.”,
“wordCount”: 3639,
“datePublished”: “2026-06-03T07:28:00.000Z”,
“dateModified”: “2026-06-03T07:28:00.000Z”,
“inLanguage”: “en-US”,
“mainEntityOfPage”: {
“@type”: “WebPage”,
“@id”: “https://fortressroofinglouisville.com”
},
“publisher”: {
“@type”: “LocalBusiness”,
“name”: “Fortress Roofing Louisville”,
“url”: “https://fortressroofinglouisville.com”
},
“author”: {
“@type”: “Organization”,
“name”: “Fortress Roofing Louisville”,
“url”: “https://fortressroofinglouisville.com”
},
“image”: {
“@type”: “ImageObject”,
“url”: “https://fortressroofinglouisville.com/wp-content/uploads/2026/03/why-the-flashing-around-your-dormer-windows-is-the-1.png”
}
}
{
“@context”: “https://schema.org”,
“@type”: “RoofingContractor”,
“name”: “Fortress Roofing Louisville”,
“url”: “https://fortressroofinglouisville.com”,
“address”: {
“@type”: “PostalAddress”,
“addressLocality”: “Louisville”
},
“areaServed”: {
“@type”: “City”,
“name”: “Louisville”
}
}
{
“@context”: “https://schema.org”,
“@type”: “FAQPage”,
“mainEntity”: [
{
“@type”: “Question”,
“name”: “How can I tell if my dormer leak is from the roof or the window?”,
“acceptedAnswer”: {
“@type”: “Answer”,
“text”: “Roof leaks typically appear as ceiling stains directly below the dormer, while window seal failures show water damage around the interior window frame or adjacent walls. To test, spray water on the exterior during dry weather – if water enters around the window trim but not the ceiling below, it’s likely a window seal issue.”
}
},
{
“@type”: “Question”,
“name”: “How long should dormer flashing last in Louisville’s climate?”,
“acceptedAnswer”: {
“@type”: “Answer”,
“text”: “Quality dormer flashing typically lasts 20-30 years in our climate, but factors like material quality, installation technique, and exposure to severe weather can reduce this to 10-15 years. Homes in wind-prone areas or those with poor attic ventilation often experience shorter flashing lifespans due to accelerated deterioration.”
}
},
{
“@type”: “Question”,
“name”: “Can I repair dormer flashing myself or should I hire a professional?”,
“acceptedAnswer”: {
“@type”: “Answer”,
“text”: “Minor caulking repairs around windows can be DIY projects, but flashing repairs require roofing expertise to ensure proper integration with existing materials and weatherproofing. Improper flashing installation often causes more damage than the original leak, making professional assessment worthwhile for most dormer leak situations.”
}
},
{
“@type”: “Question”,
“name”: “Will my homeowner’s insurance cover dormer leak repairs?”,
“acceptedAnswer”: {
“@type”: “Answer”,
“text”: “Insurance typically covers sudden damage from covered perils like storms or falling trees, but not gradual deterioration from age or poor maintenance. If the leak resulted from recent severe weather, documentation of damage and prompt professional assessment improve claim approval chances.”
}
},
{
“@type”: “Question”,
“name”: “How much does it cost to repair a dormer leak in St. Matthews?”,
“acceptedAnswer”: {
“@type”: “Answer”,
“text”: “Repair costs range from $500 for simple flashing repairs to $5,000+ for comprehensive dormer reconstruction with interior water damage repair. Factors affecting cost include the extent of damage, materials used, roof accessibility, and whether structural repairs are needed beyond the visible leak point.”
}
},
{
“@type”: “Question”,
“name”: “What’s the best time of year to repair dormer leaks?”,
“acceptedAnswer”: {
“@type”: “Answer”,
“text”: “Late spring through early fall offers ideal conditions for dormer repairs, with stable weather and longer daylight hours. However, active leaks should be addressed immediately regardless of season to prevent interior damage. Many contractors offer emergency services year-round for urgent situations.”
}
},
{
“@type”: “Question”,
“name”: “How can I prevent dormer leaks during Louisville’s storm season?”,
“acceptedAnswer”: {
“@type”: “Answer”,
“text”: “Annual inspections before storm season, keeping gutters clean, trimming trees near dormers, and ensuring proper attic ventilation all help prevent leaks. Consider professional assessment if your home has a history of dormer problems or if you notice any signs of flashing deterioration during routine inspections.”
}
},
{
“@type”: “Question”,
“name”: “Are there specific building codes for dormer flashing in Jefferson County?”,
“acceptedAnswer”: {
“@type”: “Answer”,
“text”: “Jefferson County follows Kentucky Residential Code requirements, which mandate proper flashing integration, ice and water shield in valleys and along eaves, and specific overlap dimensions for step flashing. Local codes may have additional requirements for historic districts or homes in high-wind zones.”
}
},
{
“@type”: “Question”,
“name”: “How do I know if my dormer leak has caused structural damage?”,
“acceptedAnswer”: {
“@type”: “Answer”,
“text”: “Signs of structural damage include sagging ceiling areas below the dormer, soft or spongy roof deck when walked on, visible mold growth in attic spaces, or water stains that expand over time. Professional moisture testing can identify hidden damage before it becomes visible.”
}
},
{
“@type”: “Question”,
“name”: “Should I replace my entire roof if I have dormer leaks?”,
“acceptedAnswer”: {
“@type”: “Answer”,
“text”: “If your roof is over 15 years old and experiencing multiple leak points including dormers, a complete replacement often proves more cost-effective than repeated spot repairs. This allows proper integration of all flashing systems and ensures uniform material warranties across your entire roof surface.”
}
}
]
}
{
“@context”: “https://schema.org”,
“@type”: “HowTo”,
“name”: “How to identify dormer leak sources”,
“step”: [
{
“@type”: “HowToStep”,
“position”: 1,
“name”: “Interior inspection”,
“text”: “Check attic for water stains, mold, or daylight penetration around dormer area. Use moisture meter to test suspicious spots.”
},
{
“@type”: “HowToStep”,
“position”: 2,
“name”: “Exterior examination”,
“text”: “Inspect flashing for rust, separation, or missing pieces. Check caulking around windows for cracks or gaps.”
},
{
“@type”: “HowToStep”,
“position”: 3,
“name”: “Water testing”,
“text”: “During dry weather, have someone spray water on dormer while you observe from inside attic for entry points.”
},
{
“@type”: “HowToStep”,
“position”: 4,
“name”: “Weather pattern analysis”,
“text”: “Note when leaks occur – during wind-driven rain, ice dam formation, or only during heavy downpours.”
},
{
“@type”: “HowToStep”,
“position”: 5,
“name”: “Professional assessment”,
“text”: “Document findings and consult roofing professional for accurate diagnosis and repair recommendations.”
}
],
“image”: “https://fortressroofinglouisville.com/wp-content/uploads/2026/03/why-the-flashing-around-your-dormer-windows-is-the-1.png”
}
{
“@context”: “https://schema.org”,
“@type”: “BreadcrumbList”,
“itemListElement”: [
{
“@type”: “ListItem”,
“position”: 1,
“name”: “Home”,
“item”: “https://fortressroofinglouisville.com”
},
{
“@type”: “ListItem”,
“position”: 2,
“name”: “Blog”,
“item”: “https://fortressroofinglouisville.com/blog”
},
{
“@type”: “ListItem”,
“position”: 3,
“name”: “Why the flashing around your dormer windows is the most likely spot for a leak in St. Matthews”
}
]
}
{
“@context”: “https://schema.org”,
“@type”: “Service”,
“serviceType”: “Roofing”,
“provider”: {
“@type”: “LocalBusiness”,
“name”: “Fortress Roofing Louisville”,
“url”: “https://fortressroofinglouisville.com”
},
“areaServed”: {
“@type”: “City”,
“name”: “Louisville”
},
“description”: “Learn why dormer window flashing fails in St. Matthews homes and how to spot leaks before water damage spreads through your Cape Cod or gabled roof.”
}